在 Lucene 全文检索引擎 章中讲解了 Lucene 解决了全文检索的问题,但是Lucene是单机的,如果 并发量上来,处理速度和存储能力都是有问题的,搜索要求的延迟也是很低的
这就是典型的单点问题,解决单点问题两种方式
垂直切分: 用几台相同的数据的机器来做主备切换,但是这样没解决处理速度问题,这几台机器同时提供服务吧,解决机器之间的数据同步问题有很麻烦。
水平切分:将数据切分到几个节点上去,不同的节点处理不同的数据,这样又解决内存受限与单点处理能力。(但是这样又有一个新问题,数据倾斜,这里不做讨论,解决办法参考Redis 3.0集群模式 )
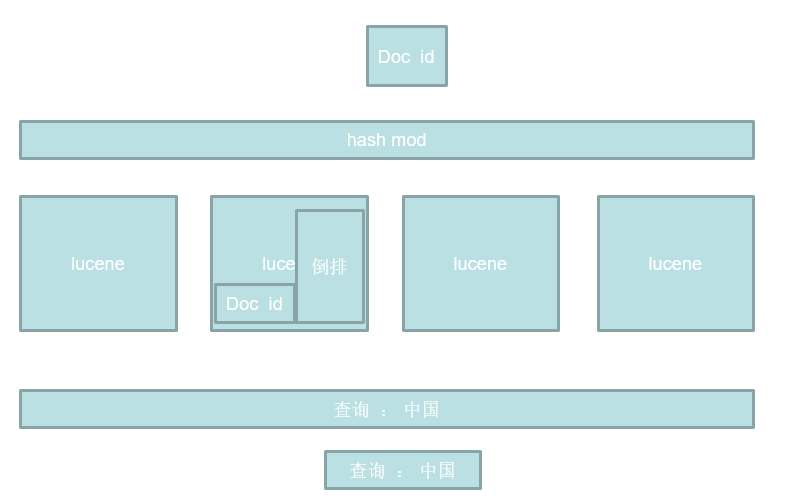
讨论发现水平切分更适合解决此问题,如何切分数据呢? 当然是常用的 Hash取模方法,对每个要建立索引的 document 设置一个id,让id的hash值对机器数取模,这时document就被传递到了某一个节点上去了,那接下来的处理不就跟单机的Lucene一样了,每台节点搭建一个lucene,分布式只是外部封装的一层,提交一个document建立索引的过程是交给某一个lucene节点进行的。
如何查询数据呢? 由于document是根据id的hash取模分发到不同的lucene节点的,所以每个节点的索引文件的是不同的,所以查找一个字符串的是需要在每一台节点都进行的,然后再拉取到一台节点上,做下归并排序合并成一个结果返回。
这时还可以优化,用户提交一个查询,可不可以随机找一个节点处理这个请求呢? 随机受到请求的这个节点分发任务到其他的节点,然后将结果拉回汇总返回用户,这样就将用户的查询任务近似平均的分发到了不同的节点上。

Elasticsearch 就是根据上面讨论的设计的
Elasticsearch
Elasticsearch是一个基于Lucene的实时的 分布式 搜索和分析引擎。设计用于云计算中,能够达到实时搜索,稳定,可靠,快速,安装使用方便,基于RESTful web接口。
ES VS SOLR
| SOLR | ES | |
| 接口 | 类似webservice的接口 | REST风格的访问接口 |
| 分布式存储 | solrCloud solr4.x才支持 | es是为分布式而生的 |
| 支持的格式 | solr xml json | es json |
| 搜索延迟 | 近实时搜索 | 近实时搜索 |
Es和solr百度指数对比

Solr和elasticsearch的性能对比

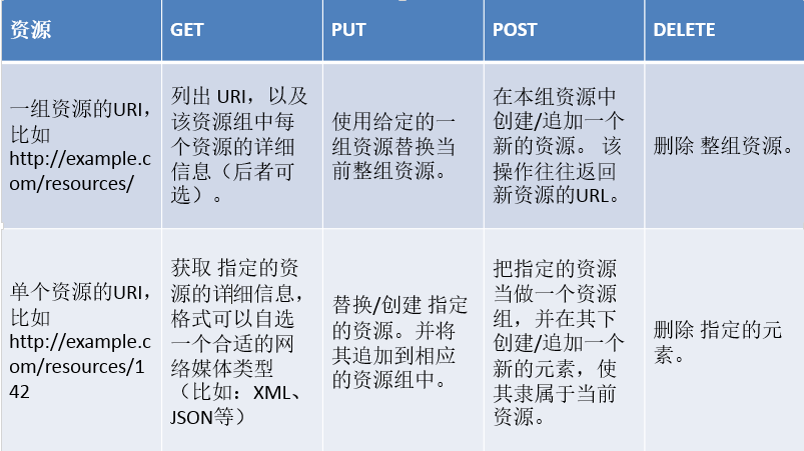
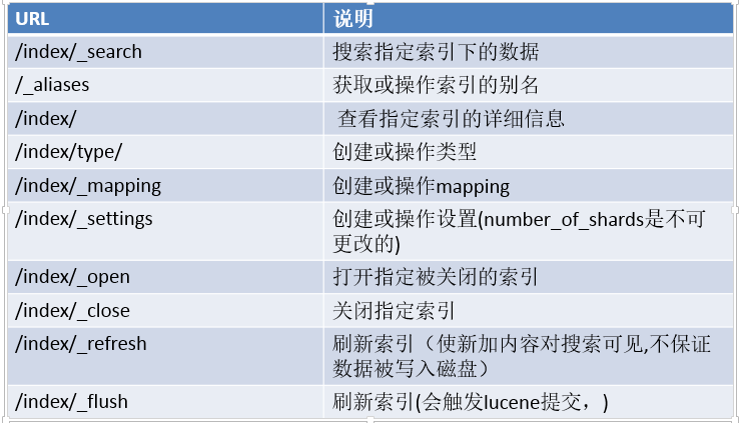
Rest简介 Representational State Transfer
一种软件架构风格,而不是标准,只是提供了一组设计原则和约束条件。它主要用于客户端和服务器交互类的软件。基于这个风格设计的软件可以更简洁,更有层次,更易于实现缓存等机制。
useradd devin
echo "devin" | passwd --stdin devin
建立安装文件夹授予权限
mkdir /opt/es
chown -R  devin:devin /opt/es
chmod 777 /opt/es
su devin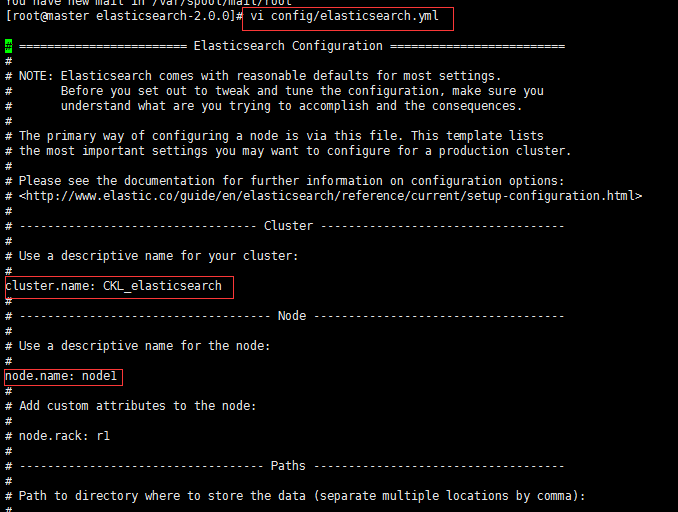
discovery.zen.ping.multicast.enabled: false
discovery.zen.ping_timeout: 120s
client.transport.ping_timeout: 60s
discovery.zen.ping.unicast.hosts: ["192.168.57.4","192.168.57.5", "192.168.57.6"]su devin
cd /opt/es/elasticsearch-2.2.0
./bin/elasticsearch
bin/elasticsearch -d # 后台运行2.安装插件
| BigDesk Plugin (作者 Lukáš Vlček) | 简介:监控es状态的插件,推荐! |
| Elasticsearch Head Plugin (作者 Ben Birch) | 简介:很方便对es进行各种操作的客户端。 |
| Paramedic Plugin (作者 Karel Minařík) | 简介:es监控插件 |
| SegmentSpy Plugin (作者 Zachary Tong) | 简介:查看es索引segment状态的插件 |
| Inquisitor Plugin (作者 Zachary Tong) | 简介:这个插件主要用来调试你的查询。 |
安装head插件:
bin/plugin install mobz/elasticsearch-head如果你发现下不下来,那可以复制错误信息中的地址,在浏览器中下载下来后,上传到服务器中,
解压到 ${es_home}/plugins 目录下(没有就新建),并重命名为head。
整合ik分词器
从地址 https://github.com/medcl/elasticsearch-analysis-ik 下载elasticsearch中文分词器
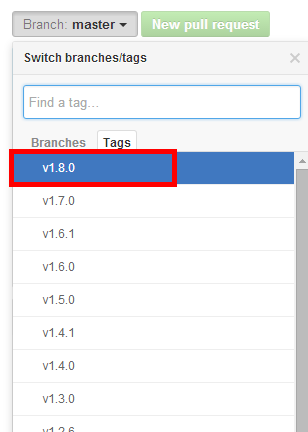
这里默认的是master的 但是master的项目需要用gradle编译,这里选择1.8.0版本。而且从下面的介绍可以知道1.8.0正好对应elasticsearch的2.2.0版本 下载后的压缩包解压后进去发现是pom工程 分别执行如下命令:
mvn clean
mvn compile
mvn package
当然这里是用maven对此工程进行编译,前提要安装maven。
前面编译了插件以后会在target/releases目录下出现一个zip包

在安装好的elasticsearch中在plugins目录下新建ik目录,将此zip包拷贝到ik目录下
将权限修改为elasticsearch启动用户的权限,通过unzip命令解压缩
例如在plugins/ik目录下执行 unzip elasticsearch-analysis-ik-1.8.0.zip
解压后查看 得到解压后的结果

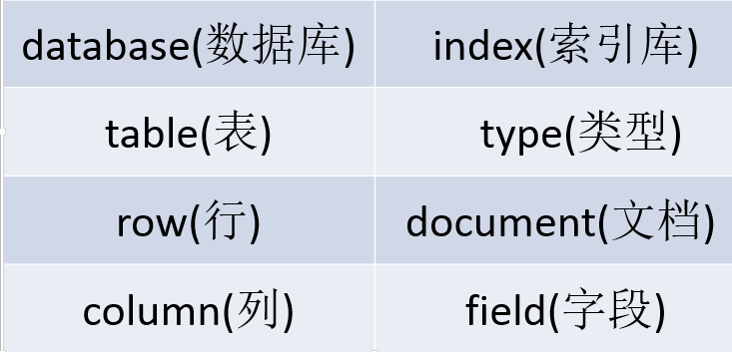
#创建索引库:
curl -XPUT http://192.168.9.11:9200/bjsxt/

#创建document:
curl -XPOST http://192.168.9.11:9200/bjsxt/employee -d '
{
	"first_name" : "bin",
	"last_name" : "tang",
	"age" : 33,
	"about" : "I love to go rock climbing",
	"interests": [ "sports", "music" ]
}'

#更新document:
curl -XPUT http://192.168.9.11:9200/bjsxt/employee/1 -d '
{
	"first_name" : "bin",
	"last_name" : "pang",
	"age" : 30,
	"about" : "I love to go rock climbing",
	"interests": [ "sports", "music" ]
}'


PUT 和 POST 都是新增,修改。PUT必须指定ID,所以PUT一般数据更新 。POST 可以指定ID,也可以不指定 做新增比较好。

#根据document的id来查询数据:
curl -XGET http://192.168.9.11:9200/bjsxt/employee/1?pretty

#根据field来查询数据:
curl -XGET http://192.168.239.3:9200/bjsxt/employee/_search?q=first_name="bin"

#根据field来查询数据:match
curl -XGET http://192.168.239.3:9200/bjsxt/book/_search -d '
{
	"query":
		{"match":
			{"name":"hadoop"}
		}
}'


#对多个field发起查询:multi_match
curl -XGET http://192.168.239.3:9200/bjsxt/employee/_search -d '
{
	"query":
		{"multi_match":
			{
				"query":"John",
				"fields":["last_name","first_name"],
				"operator":"or"
			}
		}
}'


#多个term对多个field发起查询:bool(boolean)
#	组合查询,must,must_not,should
#		must + must : 交集
#		must +must_not :差集
#		should+should  : 并集

curl -XGET http://192.168.239.3:9200/bjsxt/employee/_search -d '
{
	"query":
		{"bool" :
			{
				"must" :
					{"match":
						{"first_name":"bin"}
					},
				"must" :
					{"match":
						{"age":33}
					}
			}
		}
}'

##查询first_name=bin的,或者年龄在20岁到30岁之间的

curl -XGET http://192.168.239.3:9200/bjsxt/employee/_search -d '
{
	"query":
		{"bool" :
			{
			"must" :
				{"term" :
					{ "first_name" : "bin" }
				}
			,
			"must_not" :
				{"range":
					{"age" : { "from" : 20, "to" : 30 }
				}
			}
			}
		}
}'


#修改配置
curl -XPUT 'http://192.168.239.3:9200/test2/' -d'{"settings":{"number_of_replicas":2}}'


curl -XPOST http://192.168.239.3:9200/bjsxt/person/_mapping -d'
{
    "person": {
        "properties": {
            "content": {
                "type": "string",
                "store": "no",
                "term_vector": "with_positions_offsets",
                "analyzer": "ik_max_word",
                "search_analyzer": "ik_max_word",
                "include_in_all": "true",
                "boost": 8
            }
        }
    }
}'
ES JAVA API
添加maven依赖
连接到es集
1:通过TransportClient这个接口,我们可以不启动节点就可以和es集群进行通信,它需要指定es集群中其中一台或多台机的ip地址和端口
TransportClient client = new TransportClient().addTransportAddress(new InetSocketTransportAddress("host1", 9300))
                                              .addTransportAddress(new InetSocketTransportAddress("host2", 9300));
如果需要使用其他名称的集群(默认是elasticsearch),需要如下设置
Settings settings = ImmutableSettings.settingsBuilder().put("cluster.name", "myClusterName").build();
TransportClient client = new TransportClient(settings).addTransportAddress(new InetSocketTransportAddress("host1", 9300));
2:通过TransportClient这个接口,开启自动嗅探整个集群的状态,es会自动把集群中其它机器的ip地址加到客户端中
Settings settings = ImmutableSettings.settingsBuilder().put("client.transport.sniff", true).build();
TransportClient client = new TransportClient(settings).addTransportAddress(new InetSocketTransportAddress("host1", 9300));索引index(四种json,map,bean,es helpers)
IndexResponse response = client.prepareIndex(“bjsxt", "emp", "1").setSource().execute().actionGet();查询get
GetResponse response = client.prepareGet(“bjsxt", "emp", "1").execute().actionGet();更新update, 更新或者插入upsert
删除delete
DeleteResponse response = client.prepareDelete(“bjsxt", "emp", "1").execute().actionGet();总数count
long count = client.prepareCount(“bjsxt").execute().get().getCount();查询search
SearchType
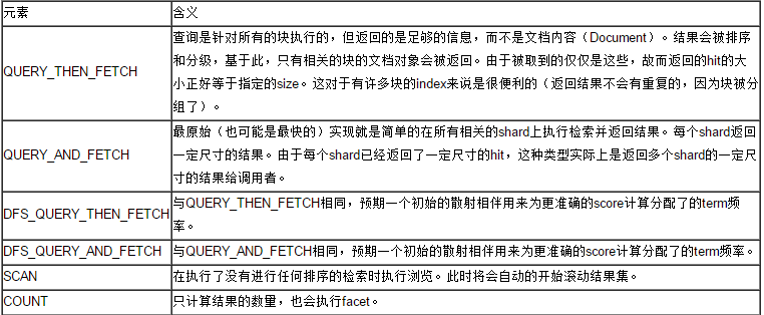
.setQuery(QueryBuilders.matchQuery("name", "test")).setFrom(0).setSize(1).addSort("age", SortOrder.DESC).setPostFilter(FilterBuilders.rangeFilter("age").from(1).to(19))| _local | 指查询操作会优先在本地节点有的分片中查询,没有的话再在其它节点查询。 |
| _primary | 指查询只在主分片中查询 |
| _primary_first | 指查询会先在主分片中查询,如果主分片找不到(挂了),就会在副本中查询。 |
| _only_node | 指在指定id的节点里面进行查询,如果该节点只有查询索引的部分分片,就只在这部分分片中查找,所以查询结果可能不完整。如_only_node:123在节点id为123的节点中查询。 |
| _prefer_node | nodeid 优先在指定的节点上执行查询 |
| _shards:0 ,1,2,3,4 | 查询指定分片的数据 |
| 自定义 | _only_nodes:根据多个节点进行查询 |
搜索引擎例子:
先用爬虫将网站数据爬下来,在将数据导入ES中,建立索引,前端传来搜索关键字,返回结果(url,文章标题,关键字部分的摘要)
步骤:
1、爬虫下载所有的网页文件(原始数据)
2、把每个网页抽取其中有用的数据
title
content
url
3、把抽取之后的数据分词索引(ES)
4、搜索(ES)
分页,高亮,结果片段
5、索引更新:
1、重新创建新索引库,让后在某个时间点替换老的库
file.rname()
2、实时更新,要个有新的数据过来,通过API更新其中一个doc (协处理器)
爬数据:
。。。。。。
处理数据与搜索:
IndexService : 处理索引建立与搜索查询
package com.laoxiao.es;

import java.io.File;
import java.net.InetAddress;
import java.util.HashMap;
import java.util.Map;

import org.elasticsearch.action.admin.indices.exists.indices.IndicesExistsResponse;
import org.elasticsearch.action.admin.indices.mapping.put.PutMappingRequest;
import org.elasticsearch.action.search.SearchResponse;
import org.elasticsearch.client.Client;
import org.elasticsearch.client.Requests;
import org.elasticsearch.client.transport.TransportClient;
import org.elasticsearch.common.settings.Settings;
import org.elasticsearch.common.text.Text;
import org.elasticsearch.common.transport.InetSocketTransportAddress;
import org.elasticsearch.common.xcontent.XContentBuilder;
import org.elasticsearch.common.xcontent.XContentFactory;
import org.elasticsearch.index.query.BoolQueryBuilder;
import org.elasticsearch.index.query.MatchQueryBuilder;
import org.elasticsearch.index.query.MultiMatchQueryBuilder;
import org.elasticsearch.index.query.MultiMatchQueryParser;
import org.elasticsearch.index.query.RangeQueryBuilder;
import org.elasticsearch.search.SearchHit;
import org.elasticsearch.search.SearchHits;
import org.junit.Test;
import org.springframework.stereotype.Service;

import com.laoxiao.util.HtmlTool;

@Service
public class IndexService {

	//存放html文件的目录
	public static String DATA_DIR="D:\\data\\";

	public static Client client;

	static {
		Settings settings = Settings.settingsBuilder()
				.put("cluster.name", "bjsxt").build();
		try {
			client = TransportClient
					.builder()
					.settings(settings)
					.build()
					.addTransportAddress(
							new InetSocketTransportAddress(InetAddress
									.getByName("node1"), 9300))
					.addTransportAddress(
							new InetSocketTransportAddress(InetAddress
									.getByName("node2"), 9300))
					.addTransportAddress(
							new InetSocketTransportAddress(InetAddress
									.getByName("node3"), 9300));
		} catch (Exception e) {
			e.printStackTrace();
		}
	}

	/**
	 * admin():管理索引库的。client.admin().indices()
	 *
	 * 索引数据的管理:client.prepare
	 *
	 */
	@Test
	public void createIndex() throws Exception {
		IndicesExistsResponse resp = client.admin().indices().prepareExists("bjsxt").execute().actionGet();
		if(resp.isExists()){
			client.admin().indices().prepareDelete("bjsxt").execute().actionGet();
		}
		client.admin().indices().prepareCreate("bjsxt").execute().actionGet();

		new XContentFactory();

		XContentBuilder builder = XContentFactory.jsonBuilder().startObject()
				.startObject("htmlbean").startObject("properties")
				.startObject("title").field("type", "string")
				.field("store", "yes").field("analyzer", "ik_max_word")
				.field("search_analyzer", "ik_max_word").endObject()
				.startObject("content").field("type", "string")
				.field("store", "yes").field("analyzer", "ik_max_word")
				.field("search_analyzer", "ik_max_word").endObject()
//				.startObject("url").field("type", "string")
//				.field("store", "yes").field("analyzer", "ik_max_word")
//				.field("search_analyzer", "ik_max_word").endObject()
				.endObject().endObject().endObject();
		PutMappingRequest mapping = Requests.putMappingRequest("bjsxt").type("htmlbean").source(builder);
		client.admin().indices().putMapping(mapping).actionGet();

	}

	/**
	 * 把源数据html文件添加到索引库中(构建索引文件)
	 */
	@Test
	public void addHtmlToES(){
		readHtml(new File(DATA_DIR));
	}

	/**
	 * 遍历数据文件目录d:/data ,递归方法
	 * @param file
	 */
	public void readHtml(File file){
		if(file.isDirectory()){
			File[]  fs =file.listFiles();
			for (int i = 0; i < fs.length; i++) {
				File f = fs[i];
				readHtml(f);
			}
		}else{
			HtmlBean bean;
			try {
				bean = HtmlTool.parserHtml(file.getPath());
				if(bean!=null){
					Map<String, String> dataMap =new HashMap<String, String>();
					dataMap.put("title", bean.getTitle());
					dataMap.put("content", bean.getContent());
					dataMap.put("url", bean.getUrl());
					//写索引
					client.prepareIndex("bjsxt", "htmlbean").setSource(dataMap).execute().actionGet();
				}
			} catch (Throwable e) {
				e.printStackTrace();
			}

		}
	}

	/**
	 * 搜索
	 * @param kw
	 * @param num
	 * @return
	 */
	public PageBean<HtmlBean> search(String kw,int num,int count){
		PageBean<HtmlBean> wr =new PageBean<HtmlBean>();
		wr.setIndex(num);
//		//构建查询条件
//		MatchQueryBuilder q1 =new MatchQueryBuilder("title", kw);
//		MatchQueryBuilder q2 =new MatchQueryBuilder("content", kw);
//
//		//构建一个多条件查询对象
//		BoolQueryBuilder q =new BoolQueryBuilder(); //组合查询条件对象
//		q.should(q1);
//		q.should(q2);

//		RangeQueryBuilder q1 =new RangeQueryBuilder("age");
//		q1.from(18);
//		q1.to(40);

		MultiMatchQueryBuilder q =new MultiMatchQueryBuilder(kw, new String[]{"title","content"});
		SearchResponse resp=null;
		if(wr.getIndex()==1){
			resp = client.prepareSearch("bjsxt")
					.setTypes("htmlbean")
					.setQuery(q)
					.addHighlightedField("title")
					.addHighlightedField("content")
					.setHighlighterPreTags("<font color=\"red\">")
					.setHighlighterPostTags("</font>")
					.setHighlighterFragmentSize(14)//设置显示结果中一个碎片段的长度
					.setHighlighterNumOfFragments(3)//设置显示结果中每个结果最多显示碎片段,每个碎片段之间用...隔开
					.setFrom(0)
					.setSize(10)
					.execute().actionGet();

		}else{
			wr.setTotalCount(count);
			resp = client.prepareSearch("bjsxt")
					.setTypes("htmlbean")
					.setQuery(q)
					.addHighlightedField("title")
					.addHighlightedField("content")
					.setHighlighterPreTags("<font color=\"red\">")
					.setHighlighterPostTags("</font>")
					.setHighlighterFragmentSize(14)
					.setHighlighterNumOfFragments(3)
					.setFrom(wr.getStartRow())
					.setSize(10)
					.execute().actionGet();
		}
		SearchHits hits= resp.getHits();
		wr.setTotalCount((int)hits.getTotalHits());

		for(SearchHit hit : hits.getHits()){
			HtmlBean bean =new HtmlBean();
			if(hit.getHighlightFields().get("title")==null){//title中没有包含关键字
				bean.setTitle(hit.getSource().get("title").toString());//获取原来的title(没有高亮的title)
			}else{
				bean.setTitle(hit.getHighlightFields().get("title").getFragments()[0].toString());
			}
			if(hit.getHighlightFields().get("content")==null){//title中没有包含关键字
				bean.setContent(hit.getSource().get("content").toString());//获取原来的title(没有高亮的title)
			}else{
				StringBuilder sb =new StringBuilder();
				for(Text text: hit.getHighlightFields().get("content").getFragments()){
					sb.append(text.toString()+"...");
				}
				bean.setContent(sb.toString());
			}

			bean.setUrl(hit.getSource().get("url").toString());
			wr.setBean(bean);

		}


		return wr;
	}
}
HtmlBean : 一个html里数据的封装类
package com.laoxiao.es;

public class HtmlBean {

	private int id;
	private String title;
	private String content;
	private String url;
	public int getId() {
		return id;
	}
	public void setId(int id) {
		this.id = id;
	}
	public String getTitle() {
		return title;
	}
	public void setTitle(String title) {
		this.title = title;
	}
	public String getContent() {
		return content;
	}
	public void setContent(String content) {
		this.content = content;
	}
	public String getUrl() {
		return url;
	}
	public void setUrl(String url) {
		this.url = url;
	}

}
HtmlTool : html工具类
package com.laoxiao.util;

import java.io.File;

import com.laoxiao.es.HtmlBean;
import com.laoxiao.es.IndexService;

import net.htmlparser.jericho.CharacterReference;
import net.htmlparser.jericho.Element;
import net.htmlparser.jericho.HTMLElementName;
import net.htmlparser.jericho.Source;

public class HtmlTool {


	/**
	 *
	 * @param path html 文件路径
	 */
	public static HtmlBean parserHtml(String path)throws Throwable{
		HtmlBean bean  =new HtmlBean();
		Source source=new Source(new File(path));
		// Call fullSequentialParse manually as most of the source will be parsed.
		source.fullSequentialParse();
		Element titleElement=source.getFirstElement(HTMLElementName.TITLE);
		if(titleElement==null){
			return null;
		}else{
			String title=CharacterReference.decodeCollapseWhiteSpace(titleElement.getContent());
			bean.setTitle(title);
		}
		String content =source.getTextExtractor().setIncludeAttributes(true).toString();

		String url =path.substring(IndexService.DATA_DIR.length());
		bean.setContent(content);
		bean.setUrl(url);
		return bean;
  }

	public static void main(String[] args) {
		try {
			parserHtml("D:/data/www.sxt.cn/blog-category-7.html");
		} catch (Throwable e) {
			// TODO Auto-generated catch block
			e.printStackTrace();
		}
	}
}
Elasticsearch的优化
1、调大系统的"最大打开文件数",建议32K甚至是64K
ulimit -a (查看)
ulimit -n 32000(设置)
2、修改配置文件调整ES的JVM内存大小
1:修改bin/elasticsearch.in.sh中ES_MIN_MEM和ES_MAX_MEM的大小,
建议设置一样大,避免频繁的分配内存,根据服务器内存大小,一般分配60%左右(默认256M)
2:如果使用searchwrapper插件启动es的话则修改bin/service/elasticsearch.conf(默认1024M)
3、设置mlockall来锁定进程的物理内存地址
避免交换(swapped)来提高性能
修改文件conf/elasticsearch.yml
boostrap.mlockall: true
4、分片多的话,可以提升建立索引的能力,5-20个比较合适。
如果分片数过少或过多,都会导致检索比较慢。
分片数过多会导致检索时打开比较多的文件,另外也会导致多台服务器之间通讯。
而分片数过少会导至单个分片索引过大,所以检索速度慢。建议单个分片最多存储20G左右的索引数据,所以,分片数量=数据总量/20G
5、 副本多的话,可以提升搜索的能力,但是如果设置很多副本的话也会对服务器造成额外的压力,因为需要同步数据。所以建议设置2-3个即可。
6、要定时对索引进行优化,不然segment越多,查询的性能就越差,索引量不是很大的话情况下可以将segment设置为1
curl -XPOST 'http://localhost:9200/bjsxt/_optimize?max_num_segments=1'
java代码:client.admin().indices().prepareOptimize(“bjsxt").setMaxNumSegments(1).get();
