Nginx是一款轻量级的Web 服务器/反向代理服务器及电子邮件(IMAP/POP3)代理服务器,并在一个BSD-like 协议下发行。由俄罗斯的程序设计师Igor Sysoev所开发,
其特点是占有内存少,并发能力强,事实上nginx的并发能力确实在同类型的网页服务器中表现较好,中国大陆使用nginx网站用户有:新浪、网易、腾讯等。
官方测试nginx能够支撑5万并发链接,并且cpu、内存等资源消耗却非常低,运行非常稳定
Nginx和apache的优缺点
1、nginx相对于apache的优点:
轻量级,同样起web 服务,比apache 占用更少的内存及资源
抗并发,nginx 处理请求是异步非阻塞的,而apache 则是阻塞型的,在高并发下nginx 能保持低资源低消耗高性能
高度模块化的设计,编写模块相对简单
社区活跃,各种高性能模块出品迅速啊
2.apache 相对于nginx 的优点:
rewrite ,比nginx 的rewrite 强大
模块超多,基本想到的都可以找到
少bug ,nginx 的bug 相对较多
3、Nginx 配置简洁, Apache 复杂
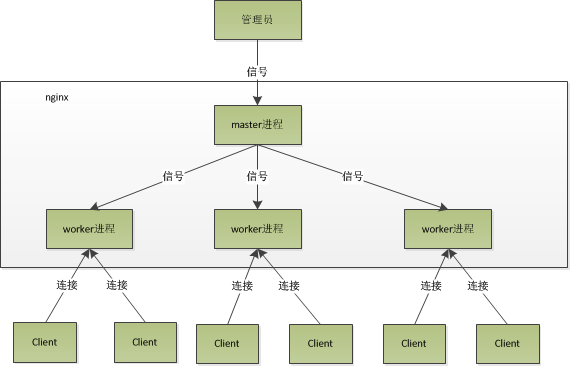
4、最核心的区别在于apache是同步多进程模型,一个连接对应一个进程;nginx是异步的,多个连接(万级别)可以对应一个进程

测试环境:CentOS 6.5
1、用ftp上传安装包
2、解压
tar xf tengine-2.2.0.tar.gz3、进入文件根目录,首先安装依赖
yum install gcc gcc-c++ openssl-devel pcre-devel 再编译安装 默认安装目录:/usr/local/nginx
./configure
make && make install
4、配置Nginx为系统服务,以方便管理
(1)在/etc/rc.d/init.d/目录中建立文本文件nginx
 cd /etc/rc.d/init.d/
 vi nginx
(2)在文件中粘贴下面的内容:
下面两处路径需要修改为实际位置
#!/bin/sh
#
# nginx - this script starts and stops the nginx daemon
#
# chkconfig:   - 85 15
# description:  Nginx is an HTTP(S) server, HTTP(S) reverse \
#               proxy and IMAP/POP3 proxy server
# processname: nginx
# config:      /etc/nginx/nginx.conf
# config:      /etc/sysconfig/nginx
# pidfile:     /var/run/nginx.pid

# Source function library.
. /etc/rc.d/init.d/functions

# Source networking configuration.
. /etc/sysconfig/network

# Check that networking is up.
[ "$NETWORKING" = "no" ] && exit 0

#记得修改此处路径
nginx="/usr/local/nginx/sbin/nginx"
prog=$(basename $nginx)

#记得修改此处路径
NGINX_CONF_FILE="/usr/local/nginx/conf/nginx.conf"

[ -f /etc/sysconfig/nginx ] && . /etc/sysconfig/nginx

lockfile=/var/lock/subsys/nginx

make_dirs() {
   # make required directories
   user=`nginx -V 2>&1 | grep "configure arguments:" | sed 's/[^*]*--user=\([^ ]*\).*/\1/g' -`
   options=`$nginx -V 2>&1 | grep 'configure arguments:'`
   for opt in $options; do
       if [ `echo $opt | grep '.*-temp-path'` ]; then
           value=`echo $opt | cut -d "=" -f 2`
           if [ ! -d "$value" ]; then
               # echo "creating" $value
               mkdir -p $value && chown -R $user $value
           fi
       fi
   done
}

start() {
    [ -x $nginx ] || exit 5
    [ -f $NGINX_CONF_FILE ] || exit 6
    make_dirs
    echo -n $"Starting $prog: "
    daemon $nginx -c $NGINX_CONF_FILE
    retval=$?
    echo
    [ $retval -eq 0 ] && touch $lockfile
    return $retval
}

stop() {
    echo -n $"Stopping $prog: "
    killproc $prog -QUIT
    retval=$?
    echo
    [ $retval -eq 0 ] && rm -f $lockfile
    return $retval
}

restart() {
    configtest || return $?
    stop
    sleep 1
    start
}

reload() {
    configtest || return $?
    echo -n $"Reloading $prog: "
    killproc $nginx -HUP
    RETVAL=$?
    echo
}

force_reload() {
    restart
}

configtest() {
  $nginx -t -c $NGINX_CONF_FILE
}

rh_status() {
    status $prog
}

rh_status_q() {
    rh_status >/dev/null 2>&1
}

case "$1" in
    start)
        rh_status_q && exit 0
        $1
        ;;
    stop)
        rh_status_q || exit 0
        $1
        ;;
    restart|configtest)
        $1
        ;;
    reload)
        rh_status_q || exit 7
        $1
        ;;
    force-reload)
        force_reload
        ;;
    status)
        rh_status
        ;;
    condrestart|try-restart)
        rh_status_q || exit 0
            ;;
    *)
        echo $"Usage: $0 {start|stop|status|restart|condrestart|try-restart|reload|force-reload|configtest}"
        exit 2
esac
5、修改nginx文件的执行权限
chmod +x nginx6、添加该文件到系统服务中去
chkconfig --add nginx 查看是否添加成功
chkconfig --list nginx7、启动,停止,重新装载
service nginx start|stop8、配置nginx访问状态监控
cd /usr/local/nginx/conf
 vi nginx.conf
添加
  location /stub_status {
       stub_status on;
     }
重新加载配置文件
service nginx reload9、配置nginx反向代理
添加
 location / {
        proxy_pass http://192.168.126.13:8080;
    }
重新加载配置文件
service nginx reload9、配置nginx负载均衡
添加
 upstream keepalive {
        session_sticky cookie=uid fallback=on mode=insert option=indirect;
        server 192.168.126.13:8080 weight=1;
        server 192.168.126.14:8080 weight=1;
    }

server {
    listen       80;
    server_name  mynginx.com;

    location / {
        proxy_pass http://keepalive;
    }
重新加载配置文件
service nginx reload10、新增健康检查模块
修改
upstream sparsematrix {
        server 192.168.230.10:8080 weight=1;
        server 192.168.230.11:8080 weight=1;
        check interval=3000 rise=2 fall=5 timeout=1000 type=http;
        check_http_send "HEAD / HTTP/1.0\r\n\r\n";
        check_http_expect_alive http_2xx http_3xx;
    }

server {
    listen       80;
    server_name  www.sparsematrix.com;

    location / {
        proxy_pass http://sparsematrix;
    }
    location /status {
        check_status;
    }
重新加载配置文件
service nginx reload11、安装mencached (用于几个RS服务器共享内)
先安装依赖libevent
  yum install libevent
  yum install memcached -y
mencached
# -d:后台启动服务
# -m:缓存大小
# -p:端口
# -l:IP
# -P:服务器启动后的系统进程ID,存储的文件
# -u:服务器启动是以哪个用户名作为管理用户
启动
memcached -d -m 30 -u root -l 192.168.126.5 -p 11211 -P /tmp/memcached.pid# RS服务器上分别 在 tomcat
添加tomcat/lib下上传mencached 支持库
asm-3.2.jar
kryo-1.04.jar
kryo-serializers-0.11.jar
memcached-session-manager-1.7.0.jar
memcached-session-manager-tc7-1.8.1.jar
minlog-1.2.jar
msm-kryo-serializer-1.7.0.jar
reflectasm-1.01.jar
spymemcached-2.7.3.jar
修改tomcat/conf/context.xml 添加
<Manager className="de.javakaffee.web.msm.MemcachedBackupSessionManager"
	memcachedNodes="n1:192.168.126.5:11211"
    sticky="false"
    lockingMode="auto"
    sessionBackupAsync="false"
	requestUriIgnorePattern=".*\.(ico|png|gif|jpg|css|js)$"
    sessionBackupTimeout="1000" transcoderFactoryClass="de.javakaffee.web.msm.serializer.kryo.KryoTranscoderFactory"
/>
可以修改tomcat/webapps/index.jsp 输出sessionid 看是否实现session共享
现在可以打开nginx安装服务器网址,看是否安装成功及实现session共享的反向代理
默认80端口